

Today we're showing three pieces of artwork from our December 2023 series books! Let us know in the comments which books you'd like to see featured in our January 2024 Artwork Reveal!
German Field Artillery of World War II
By Steven J. Zaloga
Illustrated by Felipe Rodríguez
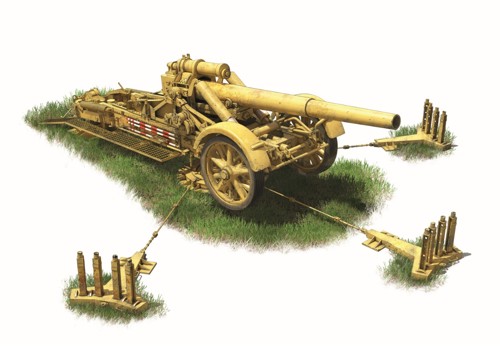
The 21cm Mörser 18 had such violent recoil when firing that it had an unusually elaborate recoil
system. When emplaced, the two forward carriage wheels were raised and the box trail rested on
two pads. This consisted of a circular pad directly under the gun, and a spade plate at the rear. The
carriage had limited traverse of about 8 degrees to either side using an arc mounted on the spade
plate and a pivot mount on the main platform. In addition, the howitzer was provided with a
double recoil system. Besides the usual recuperator, the barrel and trunnion were mounted on a
saddle assembly that recoiled along the carriage. This was reminiscent of heavy railroad gun
designs of the World War I era. One of the carriage’s more interesting recoil abatement features
was the provision for three ground anchors that could be emplaced with stakes in an arc in front
of the howitzer, attached by steel bars to the central pad.
Requested by Daniel Figueroa Giraldez.
Japan’s Indian Ocean Raid 1942: The Allies' Lowest Ebb
By Mark Stille
Illustrated by Jim Laurier
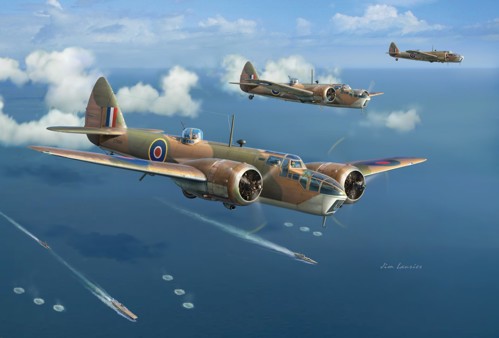
STRIKING FORCE UNDER ATTACK
One of the unknown episodes of the Indian Ocean Raid was the first Allied attack on the Striking Force during the entire war. On 9 April, in response to information from a Catalina flying boat earlier in the morning, the British launched their entire striking force available on Ceylon – 11 Blenheim IV bombers from 11 Squadron. The aircraft took off at about 0820hrs from the Racecourse; two were forced to turn back because of engine trouble. After a brief search they found the Striking Force.
The squadron leader decided to target Akagi since it was the largest carrier present. The approach of the Blenheims caught the Japanese totally by surprise, with the weakness of the Striking Force’s air defence doctrine on full display. None of the Japanese ships carried radar and the Zero fighters on CAP failed to spot the British aircraft.
In this battlescene, the Blenheims are conducting their attack from about 10,000ft, dropping a total of 27 500lb and 250lb semi-armour piercing bombs. The aircrew from 11 Squadron had no experience or training in attacking maritime targets so there was little chance they would hit a target, even a surprised one, from this altitude. Three bombs landed near Akagi’s bow, but the other bombs aimed at the carrier and the escorting cruiser Tone were far off the mark. The totally surprised Japanese did not even open fire with their anti-aircraft guns.
After dropping their bombs, the Blenheims formed a tight formation to make good their escape. The 20 Zeros on CAP responded and shot down four of the retreating bombers. Therewere no survivors from any of the aircraft. During this melee, one of Hiryu’s most experienced Zero pilots was killed. With the British formation shattered and in retreat, the Zeros broke off pursuit in case other British aircraft attempted to attack the carriers. The next time the Striking Force was exposed to air attack during the battle of Midway, it would not be so lucky.
Requested by Alex Fernández.
Cape Matapan 1941: Cunningham’s Mediterranean Triumph
By Angus Konstam
Illustrated by Adam Tooby
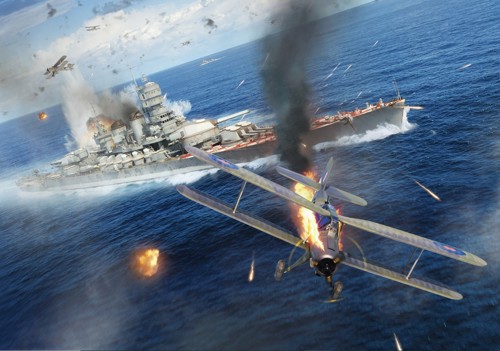
AIR STRIKE ON THE ITALIAN FLAGSHIP, 1525HRS
After being attacked by British naval aircraft that forenoon, the Italian flagship Vittorio Veneto had been steaming away from the British, heading towards the Italian coast. For a while the British had lost contact with her, but search aircraft had been looking for her, and in mid-afternoon she was re-located. A second air strike was duly launched from Formidable, and at 1510hrs it sighted the battleship 70 miles to the south-west of Crete. The strike’s leader, Lieutenant-Commander Dalyell-Stead, gave the order to attack. His small force consisted of three Albacore and two Swordish torpedo-bombers, escorted by two Fulmar fighters.
When the aircraft were spotted, the Italian battleship began a tight turn to starboard, to steam on a reciprocal course. The attackers split up, with Dalyell-Stead attempting to attack the battleship from port with the Albacores, while the Swordfish attacked her from starboard. The Albacores were first to attack, dropping down from 5,000ft before beginning their torpedo runs. Dalyell-Stead in Albacore 5G was the first to release his torpedo, at a range of 1,000 yards. Then, Albacores 5H and5F did the same. Climbing away wasn’t a real option, as the torpedo-bombers were too slow, so the first tried to cross the battleship’s bow before escaping. However, 5G was hit by closerange machine-gun fire, and crashed into the sea just yards ahead of the battleship. Their torpedoes were already in the water, though, and at 1525hrs one of the torpedoes, probably the one from 5F, struck the battleship’s stern, wrecking her outer port propeller.
Meanwhile, the two Swordfish 4B and 5K were approaching the battleship from the south, and were dropping down to carry out their own torpedo runs from off the Vittorio Veneto’s starboard beam. To distract the battleship’s gunners, the two Fulmars L and M carried out strafing runs over the Vittorio Veneto during each of the attacks, raking her decks with their machine guns as they swept over her.
The whole attack lasted less than six minutes. Only one aircraft, Dalyell-Stead’s Albacore, was lost, with all of her threeman crew, but the Vittorio Veneto suffered at least 22 casualties, and the damage to her propeller meant that her speed was now reduced to just 15 knots. This meant the British
Comments
You must be logged in to comment on this post. Click here to log in.
Submit your comment