
Today we're showing three pieces of artwork from our August 2024 series books! Let us know in the comments which books you'd like to see featured in our September 2024 Artwork Reveal!
German Soldier vs British Soldier: Spring Offensive and Hundred Days 1918
By Stephen Bull
Illustrated by Adam Hook
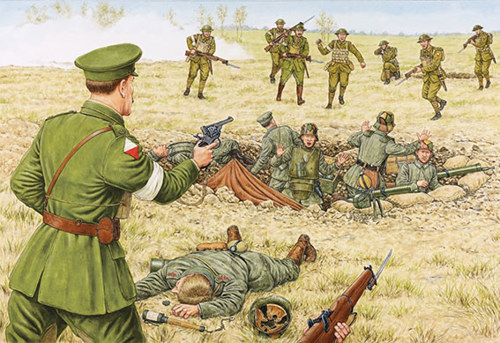
Capturing a machine-gun nest
According to a plan hatched by Major Harold W. Dick two small detachments were allotted to take a German machine-gun post occupying a shell hole just forward and to the right of 5th East Lancashire’s front line, after daylight at about 0715hrs on 20 October 1918. While six other ranks with Second Lieutenant Harry Holdsworth circled stealthily around the back of the Germans, three more, with the major himself, approached frontally once the enemy troops were engaged from the rear. Our view is that of a private soldier in the major’s little group at the denouement of the action.
From here we can see Major Dick advancing with his .455in Enfield revolver drawn, a fallen German of IR 116 at his feet. The major is in service dress with the white-over-red sign of 42nd (East Lancashire) Division on his upper arm, the only other insignia visible from this angle being the small crown rank badge on his shoulder strap. Like some of the other British troops he still has on his improvised white armband, intended to identify friendly troops during the night.
The seven khaki-clad figures advancing towards us from the background are Second Lieutenant Holdsworth (third from left) and his six men. Most carry rifle with fixed bayonet, including Holdsworth. One man, in the middle of the group next to Holdsworth, is a ‘bomber’. We can see his web ‘grenade waistcoat’, and arm raised ready to throw should the remaining Germans not surrender. The whole team are in ‘battle order’ with small packs on their backs and the small box respirator (SBR) bag on the chest, except the bomber who must contrive to keep his grenades accessible and gas-mask case to one side.
The grey-clad Germans occupy the centre ground, and four of them appear unwounded and likely to be captured together with at least two MG 08/15 light machine guns. Several men have steel helmets with the ‘lozenge’-pattern camouflage of green, ochre and reddish-brown outlined in black, as authorized from the summer of 1918. The fallen German in the foreground, hit before he could activate a stick grenade, has shed his headgear to reveal the lining of three fabric pads in leather pockets. Two of the helmeted Germans in the shell hole wear the Sappenpanzer trench armour, mainly used by sentries or machine-gunners.
Artwork requested by Kyle Lai.
Operation Barbarossa 1941: The Luftwaffe opens the Eastern Front campaign
By William E. Hiestand
Illustrated by Mads Bangsø
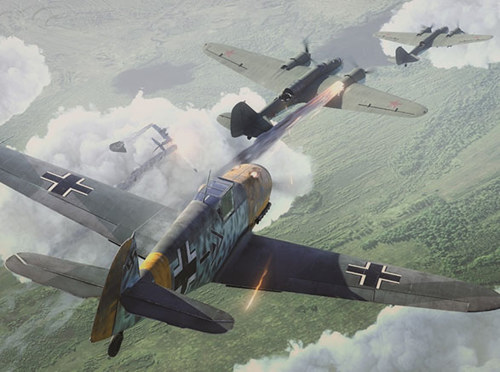
Mölders on the Eastern Front
The veteran Fliegerjaeger of the Luftwaffe in their Bf 109 fighters inflicted huge losses on the VVS in the early months of the war. With the onset of the German invasion, the Soviets ordered immediate bomber strikes on the advancing panzers. Many Soviet fighters had been destroyed on their runways in the first hours of the attack, and their loss, along with command and control confusion, left most Soviet bombers unescorted when sent into the attack. Most of the raids were by squadrons of 12 or fewer bombers, which proved disastrously vulnerable to German flak and the defending Bf 109s.
On June 25, Oberst Werner Mölders, the Luftwaffe’s leading ace, engaged a formation of SB-2 bombers and shot down two in short order. Within days, Mölders exceeded Manfred von Richthofen’s World War I score of 80 victories, and in early July became the first fighter pilot in history to shoot down over 100 enemy aircraft.
On August 7, Mölders was appointed Inspector of Fighters, responsible for the operations and tactics of the entire Luftwaffe fighter force, but he retained command of JG 51 for several months. In November, he was killed on the flight home when recalled to Germany for the funeral of Ernst Udet.
Artwork requested by Paul Williams
Kawanishi H6K ‘Mavis’ and H8K ‘Emily’ Units
By Edward M. Young
Illustrated by Gareth Hector and Jim Laurier
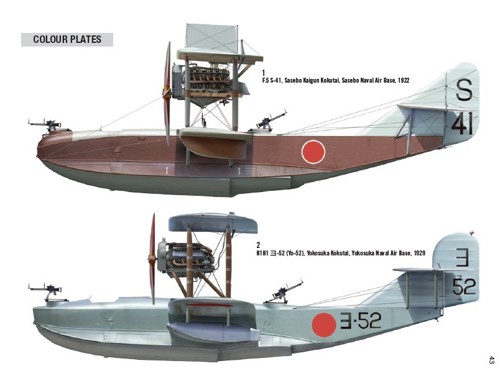
1) F.5 S-41, Sasebo Kaigun Kokutai, Sasebo Naval Air Base, 1922
2) H1H1 ヨ-52 (Yo-52), Yokosuka Kokutai, Yokosuka Naval Air Base, 1929
Artwork requested by Daniel Figueroa Giraldez.
Comments
You must be logged in to comment on this post. Click here to log in.
Submit your comment